


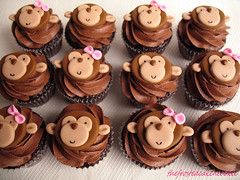
In this weeks edition of Tuesday Toppers I'm bringing out some cupcakes that I made for my daughters class as an end of the year treat. Most of the teachers at her school have classroom themes and last year her teacher did frogs and this year it was monkeys. So I went to work on a topper that was cute, but didn't take too long to make, mainly because I had to make 30 of them! They ended up being a huge hit so I thought I'd share them with you. Here's what you will need to make them (unfortunately I didn't get a picture of the items needed ):
-Rolling pin
-leaf veining tool
-1 3/4" circle cookie cutter
-Small metal icing tip (doesn't matter which one)
-Large metal icing tip (doesn't matter which one)
-Knife
-Black edible marker
-1 1/2" 5 petal flower cutter (i used a wilton one that came in a rose making kit)
-Paint brush
-Brown and tan fondant
-leaf veining tool
-1 3/4" circle cookie cutter
-Small metal icing tip (doesn't matter which one)
-Large metal icing tip (doesn't matter which one)
-Knife
-Black edible marker
-1 1/2" 5 petal flower cutter (i used a wilton one that came in a rose making kit)
-Paint brush
-Brown and tan fondant
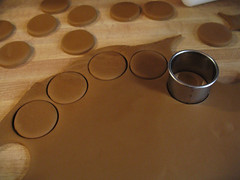
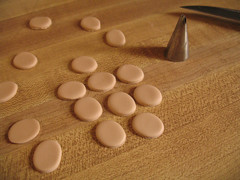
-Roll out the brown fondant to 1/4" and Using circle cookie cutter cut as many circles as you need.
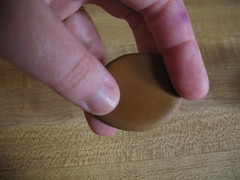
-Take the circles and stretch slightly to form an oval.
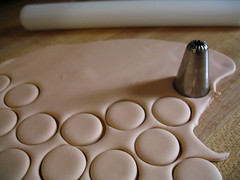
-Roll out some of the tan fondant to 1/8" and using the large piping tip cut out circles for the mouth.
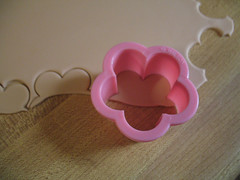
-For the eyes take some of the tan fondant and roll out very thin. Then take the flower cutter and cut out pieces with at least two of the petals.
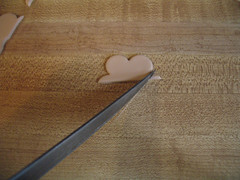
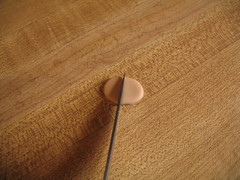
-Take the knife and cut off any excess pieces
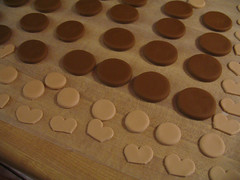
-All of the pieces ready to assemble.

-Take the eye pieces and with a touch of water attach them to the face.
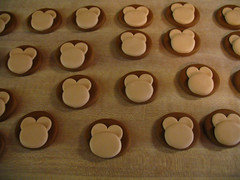
-Do the same with the mouth.

-Take some more brown fondant, make a thin rope and cut small pieces for the nose.

-Shape the pieces into tiny triangles with your fingers and attach to the face.

-Using the black edible marker make two dots for the eyes.
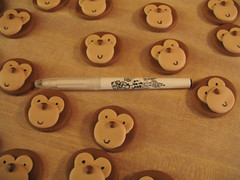
-And a small u for the mouth.
-For the ears, take the small icing tip and cut out some circles.
-Cut the circles in half.
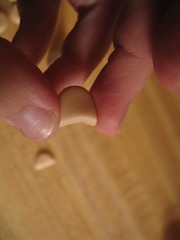
-And squeeze the flat edge to make it narrow.
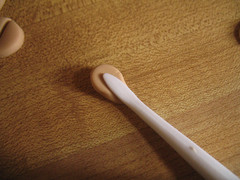
-Using leaf veiner, make an indent in the ear and attach to the back of the face. If you'd like to make the bows just roll out what ever color you want and using the small icing tip cut out a circle and pinch it the center and you have a super simple bow!

Now your ready to do some monkeying around :D
Have a great Tuesday everyone!


Oh those are the cutest!! I can't wait to try them out! I used your recipe for a fondant cake and it turned out really well! thanks so much for all of your wonderful tips and ideas
ReplyDeleteOh these came out so darn cute. I love them. I cant wait to try. How cute are they! I think these would be great for my 7 year old niece. Great work as usual.
ReplyDeleteThose are precious!!!
ReplyDeleteLove Love Love them !
ReplyDeleteADORABLE!!!!
ReplyDeleteI love this site...
ReplyDeleteGorgeous! Thanks for this - they are just too cute. I am going to bookmark this :D
ReplyDeletejust adorable!! great idea, thank you for sharing
ReplyDeleteI had never thought of using an icing tip to make little circles before - d'oh! Thanks!
ReplyDelete3 words.. GORGEOUS.. FANTASTIC AND YOU'RE MARVELOUS (Opps tat 4 words.. hehe..) keep up the good work!!
ReplyDeleteOkay these are adorable!!!! I am totally in love with these little Monkeys and think I will make them for my little monkeys next week!!! Love the step by step tutorial as well! Thanks for sharing!
ReplyDeleteoh really really cute! You re awesome
ReplyDeleteThese are so cute! Thank you so much for sharing! I just found your blog and went through all the fondant tutorials...wow! Amazing!
ReplyDeleteJust brilliant! Thanks for sharing!
ReplyDeletegreat thank you...
ReplyDeleteLOVE this tutorial. Thanks sooo much!
ReplyDeleteThanks for posting this great idea! I made them the other day!
ReplyDeletecaspita ma le tue creazioni sono splendide!!!!
ReplyDeleteTOO CUTE!!! Can't wait to try!!!
ReplyDeleteThese are adorable. I can't wait to try them for my son's 1st birthday party in a couple of weeks. It's monkey-themed so these will be PERFECT. You are AMAZING and so talented. THANK YOU!
ReplyDeleteYou are so generous to share this information! I am going to do them early this week in preperation for my dd 1st bday party on Sunday. I was wondering, if I make them a few days ahead of time, should I freeze them until I'm ready to put them on the cupcakes?
ReplyDeleteThanks, Danielle
hubrich@mchsi.com
I just found your site and I LOVE it! I hope you know just how helpful, easy and straight forward your instructions are, and how much I appreciate it. Thank you! I'm going to go make some monkey cupcake toppers right now :D
ReplyDeleteThank you for the great ideas, these are way too cute!
ReplyDeleteCan I freeze these monkeys until I am ready to place them on the cupcakes? If not, how long will they last at room temp.?
ReplyDeleteActually a question -- how did you make and attach the bows??
ReplyDeleteI made these cupcakes for my daughters 2nd birthday. She is obsessed with Curious George...well monkeys in general. They didn't quite turn out as adorable as yours, but they were pretty close and a huge hit! Your instructions were very direct and simple. I never knew fondant was this simple! Shevon
ReplyDeleteI just found your blog, love it!!!!!!! Question, how much in advance did you make them to put on the cupcakes?
ReplyDeleteLOVE these. I made the monkeys with chocolate and peanut butter fudge instead of fondant. It was a little stickier but worked well. I made them ahead of time, sealed them up, and waited until ready to serve to put them on so the fudge wouldn't dry out.
ReplyDeleteThese are adorable but I have a question: I see a paint brush listed in tools I'll need to make these, but I didn't see it mentioned in the instructions. Did I overlook it? What is the paintbrush for? Thanks!
ReplyDeleteThanks so much! My son just turned 1 and he loves monkeys so I made these for his birthday party. I made a 4 inch one as well to go on top of the little cake. I didn't have all the tools but I was able to improvise and they turned out great.
ReplyDeleteThank you SO much for providing the instructions for these cuties!
ReplyDeleteSarah H.
Thanks for the tutorial!
ReplyDeleteCan't wait to try them out on my own - they look so cute! :)
Helpful tips! I would never have gotten this on my own! Great job!
ReplyDeleteThese are Actually Impressive ideas in concerning blogging. Its great
ReplyDeleteI high appreciate this post. You’ve nailed it! update this blog with more information.
ReplyDelete