home about recipes how-to bookstore contact

Tuesday, March 31, 2009

Tuesday toppers: Easter


Its hard to believe, but Easter is just around the corner. So i pulled out my fondant and sat down to make a few toppers that even the easter bunny himself would love. Over the next two weeks i'm going to show you how to make all three of these little toppers just because i'm feeling generous that way :D. This weeks topper is going to be a cute little carrot and here's what you'll need to make one:


-Fondant smoother
-Knife
-Paint brush and water
-Leaf veiner
-Orange and green fondant


-Take a 1" ball of fondant and roll it out into a log.
-Using a fondant smoother at an angle, taper one end of log.


-With leaf veiner, make a hole in large end of carrot.
-for carrot top, take small amount of green fondant and roll into a log.


-About 2/3 of the way in flatten with fondant smoother.


-Using knife, cut three slits in flattened section.


-Cut center section into a point to match two outer pieces.


-Now with a small amount of water attatch carrot top to carrot.


-Using back of knife make markings in carrot alternating on each side


Here's one way to get your kids to eat their vegetables :D


Stay tuned till next week when i show you how to make the easter egg, and a special edition of tuesday toppers (on wednesday) where i'll show you how to make the easter bunny himself.

Monday, March 30, 2009

Ironcupcake Voting Time!!

Hey all my lovely blog readers don't forget to head on over to No One Puts Cupcake in a Corner and cast your vote for your top three favorite Nuts & Seeds cupcakes ( hopefully mine will be one of them, no pressure here :D ) Voting continues until Friday April 3rd at noon.


Gimme some brown sugar and praline, cupcake!


Here's the link to the my recipe Gimme some brown sugar and praline, cupcake!
Happy voting :)

Saturday, March 28, 2009

Emily's Bunny Cake

My oldest daughter has been on her spring break this week, so to keep her busy (and myself sane) I planned several projects. One of which was her very first fondant covered cake. We were both very pleased with how it turned out. I think I have a future cake decorator on my hands!

bunny cake

She was very insistant on wanting to do a funfetti cake for some reason, lol, so i went with it and just figured we'd do a from scratch cake on the next go round.

hhh 010

She wanted to look like she was really baking so she splashed powdered sugar on herself.

hhh 009

It was so cute watching her do this because she was so intent on getting it right!

icing the cake
All finished with the crumb coat and into the fridge to set up before the fondant.

icing the cake

She was sooo proud of this bunny rabbit when she finished it.

fondant easter bunny

Maddie had to get in on the action and made a "bunny"on a stick (a piece of spaghetti) and then proceeded to eat its head off.

maddie's "bunny"
It turned out to be a wonderful experience for all of us and I think i've gotten a new cake buddy out of the deal :)

Tuesday, March 24, 2009

Tuesday toppers: Quilt


We celebrated my mom's birthday this weekend and since she co-owns a quilt shop and is a quilt fanatic I came up with these toppers just for her. (I also would love to get my hands on one of those antique singer sewing machines :) So this weeks installment is a quilt in honor of my mom (because today just so happens to be her birthday), and here's what you'll need to make one:


-Rolling pin

-Knife

-Paint brush and water

-Quilting tool (optional if you want to add the quilting detail)

-White, light purple,and dark purple fondant


-Take a small amount of each color, ball them up and roll them out very thinly for the base of the quilt.
-Cut out a square approx. 2" x 2"


-Take the rest of the remaining three colors and roll them out to about 1/8".

-Cut each piece into 1/2" strips and then in to 1/2" x 1/2" tiles.


-Using a small amount of water paint entire 2x2 square.

-Start placing tiles in the pattern desired, painting very small amounts of water on the sides of each tile as you lay them.


-Continue placing tiles in desired pattern 4 across by 4 down.


-Cut off excess to square piece off.

-Take quilting tool and run it all the way across every row, top and bottom, so that you are framing each tile, turn the piece and do the same going in the opposite direction.


You now have a beautifully quilted topper :)


Happy Birthday Mom!! :)

Saturday, March 21, 2009

Gimme some brown sugar and praline, cupcake!


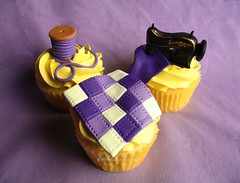
IronCupcake Challenge Nuts & Seeds

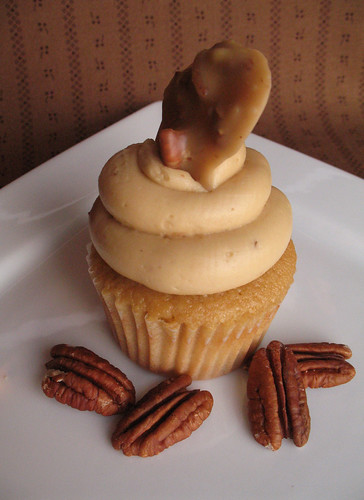
Well I decided to take the plunge and enter a cupcake in THE one and only cupcake challenge. the IRONcupcake challenge :) So I got to working in the kitchen and came up with these sweet little cupcakes.


Gimme some brown sugar, cupcakes

3 cups cake flour
1 tsp salt
1 1/2 tsp baking powder
1 1/2 cups brown sugar
1/2 cup dark brown sugar
6 oz. (1 1/2 sticks) unsalted butter, room temperature
1/4 cup sour cream
1 cup milk
4 eggs, at room tempurature
2 tsp pure vanilla extract

Directions

Preheat oven to 350F. In mixing bowl sift in cake flour, salt, baking powder, and brown sugars and mix for 30 seconds on low speed to combine. Add in butter and sour cream and mix for about 30 more seconds. In a seperate bowl whisk together milk, eggs, and vanilla and add it to the flour mixture in 2 parts mixing thouroughly and scraping the sides after each addition. Line cupcake pans with paper liners and fill 2/3 way full. Bake for 18 minutes or until toothpick comes out clean. Cool on wire rack. Makes approx. 30 cupcakes

Pralines


1 1/2 cup pecan halves
1 1/2 cup packed light brown sugar
1/2 cup sugar
1 cup heavy cream
1/4 tsp salt
2 tbsp unsalted butter
1 tsp pure vanilla extract

In a 300F oven toast pecan halves on a foil lined cookie sheet for about 8 minutes checking often because they burn easily! Let cool and chop roughly ( I did this so I could have smaller pralines to fit on top of my cupcakes, but you don't have to do it.)

In a medium heavy bottomed sauce pan combine brown sugar, sugar, heavy cream, and salt. Cook over medium heat until the sugars dissolve and mixture starts to come to a boil, making sure to stir occasionally.

Continue cooking until mixture reaches 235F-240F on a candy thermometer or soft-ball stage when small amount is placed in water, about another 15-20 minutes. Be very careful with this step, as overcooking will cause a grainy texture!

Remove from heat and add butter, vanilla, and pecans. Stir with a wooden spoon contiuously for approx. 3-4 minutes until mixture thickens enough to be scooped out and not be too runny. I used a cookie scoop to get even, small pralines, but 2 spoons will work too. You need to work very fast because the mixture will set up in the pan if you don't. If you have two people that can scoop all the better!

Brown Sugar Praline Buttercream
(Adapted from Marthastewart.com)

4 large egg whites
1 cup packed light-brown sugar
1/4 teaspoon salt
1 1/2 cups (3 sticks) unsalted butter, room temperature, cut into tablespoons
1 tsp vanilla
8 pralines chopped finely (recipe above or purchased ok too)


In a heatproof bowl set over (not in) a pan of simmering water, whisk together egg whites, sugar, and salt. Cook, whisking constantly, until the sugar has dissolved and the mixture is warm to the touch.

Transfer to the clean bowl of an electric mixer with whisk attatchment. Beat on medium speed until fluffy and cooled, about 15 minutes.

Raise speed to high; beat until stiff peaks form. Switch to paddle attatchment and reduce speed to medium-low; add butter, 2 to 3 tablespoons at a time, until fully incorporated. Add in vanilla. Fold in praline pieces with spoon.


Ok now here's what I need you to do! Head on over to NO ONE PUTS CUPCAKE IN A CORNER and vote for your top 3 favorites (hopefully mine will be one of them :D ) Voting starts Sunday, March 29 at 8 p.m. and runs through Friday, April 3 at 12 noon.


The winner will recieve these fabulous prizes:
-A Bunnycake Easter Plushie by DOGBONEART.
-A whimsical piece by CAKEASAURUS.
-as well as a pair of cupcake earrings from LOTS OF SPRINKLES.
-a collection of all new printed cupcake liners, 200 in all from Sweet Cuppin' Cakes Cupcakery.
-PLUS, IronCupcake:Earth can not forget our good friend, CAKESPY, who is now going to be doing a piece for our winner each month until further notice - sweet!
-HEAD CHEFS by FIESTA PRODUCTS
-HELLO CUPCAKE by Karen Tack and Alan Richardson
-JESSIE STEELE APRONS
-TASTE OF HOME books,
-a t-shirt from UPWITHCUPCAKES.COM


Iron Cupcake:Earth is sponsored in part by 1-800-Flowers . And as a special thank you, we would like to once again thank DIANAEVANS for her participation in the February challenge. An incorrect link was posted and we want to be sure that she gets the recognition she deserves. Thanks again Diana!

NOW DON'T FORGET TO VOTE!!

Tuesday, March 17, 2009

Tuesday Toppers: Leprechaun Hat


Happy St. Patty's Day everyone!

Today I'm bringing you the second topper in my St. Patricks Day series, the little leprechaun hat. Here's what you will need to make it.

-Rolling pin

-Fondant smoother

-1 1/2" circle cookie cutter

-Paint brush and water

-Knife

-Green, black, and yellow fondant


-Roll out small ball of green fondant to about 1/8" and use cutter to cut out base of hat.


-For top of hat take a 1" ball of fondant and using fondant smoother roll into a slight tube shape.


-With index finger and thumb pinch top edge and bottom edge to make them more defined.

-Roll again with fondant smoother to make a nice cylinder shape.


-With fondant smoother at a 45 degree angle, roll cylinder so the top is larger than the bottom.


-Using index finger and thumb again, pull top edge out a little more to make it more exaggerated.


-For black trim, roll out a thin rope and flatten with fondant smoother.


- Trim to 1/8" wide.

-Using water, glue trim to base (smaller end) of hat top and trim off excess.


-With a small amount of water attatch hat top to brim.


-If you would like the brim of the hat curved up on the sides, take two small pieces of waxed paper, fold them up, and place them on either side while fondant dries.

-For buckle, take yellow and roll out very thin rope.


-Cut a piece approx 3/4" in length and glue ends together with very small amount of water.

- Square off corners using end of paintbrush and pinching with fingertips.

-Attatch with small amount of water to trim.


Now be careful that a mischievous little leprechaun doesn't come and try to steal his hat back ;)